Showing posts with label Yeast Breads. Show all posts

Sunday, July 8, 2012

30 by 30: Sourdough Bread

I was very pleased with how this sourdough turned out. It had a great sour flavor even though it was the first loaf from my starter. The sourdough starter takes about a week to ferment before you can use it but it gets stronger the longer you feed it. I didn't keep my starter since we will be moving in a few months but I plan on making a new starter once we are settled in our new place!

Sourdough
Recipe from AllRecipes

Starter:

1 (.25 oz) package active dry yeast
2 cups water
2 cups all purpose flour

In a large non-metallic bowl mix together starter ingredients. Leave in a warm place to ferment for 4-8 days. When mixture is bubbly and has a pleasant sour smell, it is ready to use. (To continue growing the starter, replace with equal parts flour & water... for example, if you use 1 cup starter add in 1 cup water and 1 cup flour with a pinch of sugar. Leave to ferment again). Refrigerate starter once fermented.

Bread:

3/4 cup warm water (110 degrees F/45 degrees C
1 cup sourdough starter
1 1/2 teaspoons salt
2 2/3 cups bread flour
1 1/2 teaspoons active dry yeast

Mix water and yeast; let sit until bubbly. Add remaining ingredients and knead until smooth and elastic. Let dough rise until doubled in size. Punch down and shape into loaf. Bake at 375 for 30 minutes.

Tuesday, May 15, 2012

TWD - BWJ: Pecan Sticky Buns

This recipe is one of those recipes that is so amazing and yet SO bad for you! I think there was a total of 5 or 6 sticks of butter in the entire recipe but you know what? They were so delicious that I just didn't care!

The recipe started with brioche dough... my absolute favorite dough to work with. The brioche is then laminated with more butter just like puff pastry. Then you top it with cinnamon and sugar, roll it up, put it in a pan with more butter and brown sugar, and bake it.

They are AMAZING! I don't think I would ever make them just for a random weekend breakfast for my family but for a group of people I most definitely would!

Thanks to Lynn of Eat Drink Man Woman Cats Dogs and Nicole of Cookies on Friday for hosting this week. The recipe can be found at their blogs.

Wednesday, May 2, 2012

30 by 30: Pita Bread


I made this pita bread over the weekend and loved how easy it was! While mine aren't perfectly round they were perfectly delicious! It was kind of a last minute decision to make the pitas and so I ended up going with a recipe that I could make right away. There was one recipe I really wanted to try but the dough had to sit overnight in the refrigerator. I still plan on trying that recipe, though, because it will enhance the flavor. :) But this was a great, quick recipe and if I ever need pita bread in a hurry again I will definitely make it!


Pita Bread
Recipe from AllRecipes

1 1/8 cups warm water (110 degrees F/45 degrees C)
3 cups all-purpose flour
1 teaspoon salt
1 tablespoon vegetable oil
1 1/2 teaspoons white sugar
1 1/2 teaspoons active dry yeast

Place all ingredients in bread pan of your bread machine, select Dough setting and start. When dough has risen long enough, machine will beep.               

Turn dough onto a lightly floured surface. Gently roll and stretch dough into a 12 inch rope. With a sharp knife, divide dough into 8 pieces. Roll each into a smooth ball. With a rolling pin, roll each ball into a 6 to 7 inch circle. Set aside on a lightly floured countertop. cover with a towel. Let pitas rise about 30 minutes until slightly puffy.

Preheat oven to 500 degrees F (260 degrees C). Place 2 or 3 pitas on a wire cake rack (I used a pizza stone). Place cake rack directly on oven rack. Bake pitas 4 to 5 minutes until puffed and tops begin to brown. Remove from oven and immediately place pitas in a sealed brown paper bag or cover them with a damp kitchen towel until soft. Once pitas a softened, either cut in half or split top edge for half or whole pitas. They can be stored in a plastic bag in the refrigerator for several days or in the freezer for 1 or 2 months.

Monday, March 5, 2012

30 by 30: Homemade English Muffins

 I have a little more than 6 months left until my 30th birthday and considering I have only posted 1 other "30 by 30" recipe I figured I needed to get busy!!!

English muffins have been on my list for quite some time now but I never got around to making them. They aren't difficult to make and taste SO good when they are fresh! I will definitely be making them more often!

To view my 30 by 30 list click HERE.


Homemade English Muffins
Recipe from AllRecipes

1 (.25 ounce) package active dry yeast
3 tablespoons sugar, divided
1/4 cup warm water (105 degrees to 115 degrees)
1 cup milk, scalded
3 tablespoons butter or margarine
3/4 teaspoon salt
1 cup whole wheat flour
3 cups all-purpose flour, divided
1 egg, beaten
Cornmeal
Dissolve yeast and 1 tablespoon sugar in water. Set aside.
In a mixing bowl, combine milk, butter, salt, whole wheat flour and 1 cup all-purpose flour. Beat well with an electric mixer. Add egg and yeast mixture; beat until smooth. By hand, stir in enough remaining all-purpose flour to make a soft dough. Knead on a lightly floured surface until smooth and elastic, about 6-8 minutes.
Place in a greased bowl; cover and let rise in a warm place until doubled, about 1 hour.
Punch dough down. Place on floured surface. Roll to 1/2-in. thickness. Cut into 4-in. circles. Allow to rise until doubled.
Lightly sprinkle an electric fry pan or griddle with cornmeal. Bake over low heat for 10 minutes until nicely browned. Turn and bake 10 minutes longer. Cool. Store in the refrigerator.
To serve, split with a fork and toast.

Tuesday, February 28, 2012

Hasselback Cheesy Garlic Bread


As soon as I saw this bread on Pinterest I knew I'd be making it. I mean, what's not to like? It's bread and cheese! :) I decided to make it one night on a whim and didn't have any sliced cheese. I didn't let that stop me, though. I just used the shredded mozzarella I had in the fridge and it worked like a charm. It is a little harder to stuff shredded cheese in the cuts but the bread was still delicious! Can't wait to make it again!

Hasselback Cheesy Garlic Bread
Recipe from Lauren's Latest

1 cup Warm Water
1 Tablespoon Honey
1 envelope Active Dry Yeast (2 1/4 Teaspoons)
1 teaspoon Salt
3 cups Bread Flour
Olive Oil, For Greasing Surfaces
⅓ pounds Sharp White Cheddar, Or Any Other Cheese You Prefer
½ cups Garlic Butter

In a large bowl, stir water, honey and yeast together. Let yeast proof 5 minutes. Once you know yeast is active, stir in salt and the flour in 1/4 cup increments. If you are using a stand mixer, be sure to not increase your speed higher than a 2 or ‘stir’. Once dough starts pulling away from the sides and the bowl seems to be pretty clean, set a timer for 5 minutes and walk away. Let the machine knead the dough. After 5 minutes, dough should be smooth and tacky but when touched shouldn’t leave any dough on your fingers.

Grease the bowl and the dough. Cover with plastic wrap or a kitchen towel and let rise 1 hour or until doubled in size.
Punch down dough and cut into two equal portions. Form into two long baguettes the length of the cookie sheet. I like to twist mine because it looks cool, but it also keeps its length and doesn’t shrink. Cover with plastic wrap and rise 30 minutes. Start to preheat oven to 400 degrees F and place dough close to the oven where it’s nice and warm. Once oven is preheated, remove plastic wrap, from the dough reduce oven to 350F, put the bread into the oven and bake 20 minutes.
In the meantime, slice the cheese into thin slices and melt the butter.
Pull loaves of bread out of the oven after 20 minutes and brush with the melted garlic butter. Bake another 5-7 minutes or until bread begins to turn a golden brown. Remove from oven and cool 15 minutes.
Cut 1-inch slices 3/4′s of the the way through the loaves. Brush garlic butter in between each slice and fill with a slice of cheese. Bake another 3-5 minutes or until cheese is completely melted.
Serve immediately.

Tuesday, February 7, 2012

TWD: Baking with Julia - White Loaves


Tuesdays with Dorie is back!!!! I baked along for 3 1/2 years when we were working through "Baking:From My Home to Yours" and am excited to be back as we begin our journey through "Baking with Julia". I am really excited for this book because of the wide variety of recipes. It's going to be a fun ride!

The first recipe chosen were the White Loaves. There is something so wonderful about bread straight from the oven and these loaves didn't disappoint. They were gone quickly! We ate the slices with butter & honey and even used some for sandwiches. SO good!

Thanks to Laurie of Slush and Jules of Someone's in the Kitchen for leading this project and hosting this week. The recipe can be found at their blogs, or better yet, go buy the book! :)


Monday, February 6, 2012

Pizza Pretzel Bites

Whenever I'd go to the pretzel stand in Germany I'd almost always get a pizza pretzel. I mean, the concept was genius.... a pizza on top of yummy pretzel dough! I was planning on making pizza for dinner last night but had forgotten to make my dough on Saturday (the recipe I use sits overnight). I still wanted pizza and then it hit me... make pizza pretzels!

These were AMAZING!!!!! I served them with pizza sauce for dipping but they were great alone. They are even delicious cold from the fridge a few hours later. They didn't take much time to make, either. I think MAYBE 15-20 minutes active time. Totally worth the effort!

Enjoy!

Pizza Pretzel Bites
Recipe from Sweet Pea's Kitchen

1 1/2 cups warm water
2 tablespoons light brown sugar
1 package active dry yeast
3 ounces unsalted butter, melted
2 1/2 teaspoons kosher salt
4 1/2 to 5 cups all-purpose flour
Canola oil
Pepperoni slices, cut into small pieces
Shredded mozzarella cheese
5 quarts water
3/4 cup baking soda
1 whole egg, beaten with 1 tablespoon cold water
Coarse sea salt
Pizza sauce-for dipping

In the bowl of a stand mixer fitted with the dough hook, mix together the water, sugar, yeast, and butter. Let sit for 5 minutes.

Add the salt and flour to the yeast mixture. Knead dough at medium speed until a smooth and elastic ball forms, 3 to 4 minutes. If dough is sticky, add 1 tablespoons of flour at a time until dough comes together.

Transfer the dough to a lightly oiled large bowl and turn the dough to coat with the oil. Cover with plastic wrap and let rise in a warm place until doubled in size, about 1 hour.

Turn out the dough onto a lightly floured surface. Divide into 8 equal pieces. Roll each piece into a 21 inch rope. Cut the dough into 3-inch pieces to make the pretzel bites. Roll each bite flat with a rolling pin and stuff with pepperoni and cheese. Fold over the dough and pinch the ends. Place on a baking sheet and continue until all pretzel bites are stuffed.

Preheat the oven to 425 degrees F. In a large saucepan, bring water to a boil. Add the baking soda and lower heat to a simmer. Carefully boil pretzels in batches. Boil for about 30 seconds. Remove with a large slotted spoon. Place pretzel bites on a parchment paper lined baking sheet, about 2 inches apart. Brush the tops with the egg wash and season liberally with the salt. Place into the oven and bake for 15 to 18 minutes, or until golden brown.

Serve warm with pizza sauce for dipping.


Monday, November 7, 2011

Hawaiian Dinner Rolls


I love the Hawaiian rolls that you buy at the store and was thrilled to find this copycat recipe. These were so delicious and I will definitely be making them again!


Hawaiian Rolls
Recipe from A Homemade Kitchen

1/2 cup warm water
1/2 cup pineapple juice
1/4 cup melted butter, plus more for brushing
1 tablespoon dry yeast
1 large egg, beaten
1/2 teaspoon pure vanilla extract
6 tablespoons sugar
3 cups all-purpose flour

Combine water, pineapple juice, and melted butter in a large bowl. Sprinkle in yeast. Add salt, egg, vanilla, and sugar, stir to combine. Using a wooden spoon, mix in the flour 1 cup at a time. Use your hands to mix if the dough becomes too stiff. The dough will be very soft and slightly shaggy. Cover loosely and let rise in a warm spot until doubled in size, about 2 hours.

If baking later, place the covered and risen dough in the fridge overnight before shaping into rolls and baking.

On baking day, spray two 9-inch round cake pans with non-stick spray. Shape the dough into 16 evenly sized balls. If you have a digital scale, use it to size each ball at 1 1/2 ounces. Place 8 balls of dough in each cake pan, cover with a towel, and let rise until doubled in size, about 2 hours.

Preheat oven to 350 degrees F. Brush the rolls with melted butter. Bake for 20-25 minutes, or until golden brown. Cool on rack.

Saturday, September 10, 2011

French Bread Rolls


Nothing finishes off a meal better than a fresh, hot dinner roll! These are so good and I have to stop myself from eating the whole batch! :)

Enjoy!

French Bread Rolls

1 1/2 cups warm water
1 TBSP yeast
2 TBSP sugar
2 TBSP vegetable oil
1 tsp salt
4 cups bread flour

In a large bowl mix together water, yeast, and sugar. Let stand 10 minutes.

Add oil, salt, and 1/2 of the flour. Stir in remaining flour, 1/2 cup at a time, until the dough has pulled away from sides of bowl.

Turn out onto a lightly floured surface and knead until smooth and elastic, about 8 minutes. Lightly oil a large bowl; place dough inside turning to coat.

Cover and let rise until doubled in volume, about 1 hour.

Deflate dough and divide into 16 round balls. Place on lightly greased cookie sheet at least 2 inches apart. Cover rolls and let rise until doubled.

Bake at 400 for 18-20 minutes or until golden brown.

Wednesday, August 24, 2011

Blueberry Cinnamon Rolls

My daughter started school on Monday and requested these cinnamon rolls for her special breakfast. They were absolutely delicous. Lemon and blueberries always work so well together and it was a great combination for these rolls. We'll definitely be making them again!

Enjoy!


Blueberry Cinnamon Rolls

Recipe from Annie Eats

For the cinnamon rolls:
6½ tbsp. sugar
1 tsp. salt
5½ tbsp. unsalted butter, at room temperature
1 large egg, slightly beaten
1 tsp. lemon zest
3½ cups bread flour
2 tsp. instant (rapid rise) yeast
1 cup plus 2-4 tbsp. whole milk or buttermilk, at room temperature

For the filling:
3 tbsp. plus 1 tsp. sugar
¾ tsp. ground cinnamon
1½ cups fresh blueberries

For the glaze:
3 cups powdered sugar
1 tbsp. freshly squeezed lemon juice
6-7 tbsp. milk
1 tsp. lemon zest


Directions:

In the bowl of an electric mixer, cream together the sugar, salt and butter on medium-high speed until smooth. Mix in the egg and lemon zest until incorporated. Mix in the flour, yeast and milk until a dough forms. Switch to the dough hook and knead on low speed, about 8 minutes until the dough is silky and supple, tacky but not sticky. (You may need to add a little extra flour or liquid to achieve this texture.) Lightly oil a large bowl and transfer the dough to the bowl, turning once to coat. Cover with plastic wrap and let rise at room temperature for about 2 hours, or until doubled in size.

Mist a work surface with spray oil. Roll it out into a rectangle with a rolling pin, lightly dusting the dough with flour if needed to keep it from sticking (about 12 x 14 inches for larger rolls or 9 x 18 inches for smaller rolls). Combine the sugar and cinnamon in a small bowl and mix to blend. Sprinkle the cinnamon sugar mixture over the surface of the dough. Sprinkle the berries over the top evenly of the dough. Starting with the wide edge, roll up the dough into a cigar-shaped log, creating a cinnamon sugar spiral as you roll. Pinch the seam shut, and with the seam side down, slice the log into your desired number of rolls. Transfer them to a baking sheet lined with parchment paper or a silicone baking mat, placing the rolls about ½-1 inch apart.

Cover loosely with plastic wrap and let rise at room temperature 75-90 minutes, until the rolls have grown into each other and have nearly doubled in size. At this point, the rolls can also be covered and retarded in the refrigerator for up to 2 days. Pull the pan out of the refrigerator 3-4 hours before baking to let the dough proof.

Preheat the oven to 350˚ F. Bake for 20-30 minutes, or until golden brown. Let cool in the baking about 10 minutes, then transfer to a wire rack. Whisk together the glaze ingredients in a medium bowl until smooth and then swirl over the top of the cinnamon rolls. Let cool at least 15-20 minutes before serving.

Tuesday, August 23, 2011

TWD: Golden Brioche Loaves

Brioche is an amazingly delicious, super soft buttery bread. If you've never had brioche, you need to either go buy a loaf or make some yourself! Not only is the bread delicious but the dough has got to be the silkiest dough I have ever worked with. LOVE LOVE LOVE brioche!

We ate the brioche plain, toasted with jam, and as French Toast. Dorie had a playing around idea for sugar crusted french toast and we decided to make it. HOLY MOLY!!! Hands down the best french toast EVER!

For the french toast, slice the brioche into 1" slices. Soak 6 1" slices for 3 minutes in a mixture of 6 large eggs, 3 egg yolks, 3 1/2 cups milk, 2/3 cup sugar, 1 TBSP vanilla, and 1/2 tsp salt. When bread is ready, heat a large skillet or griddle and melt 3 TBSP butter. Sprinkle butter with 2 TBSP sugar and top with bread slices. Sprinkle tops of bread with more sugar and flip to cook. Serve with fruit & syrup.
Head over to Tea and Scones for the brioche recipe. You won't be sorry!!!


Wednesday, May 18, 2011

Banana Chocolate Chip Cinnamon Rolls


You can't really go wrong with just about any variation of a cinnamon roll. This one is filled with banana chunks and chocolate chips. I did top it with a cream cheese frosting, but to be honest, it didn't need it. Now don't get me wrong, I love cream cheese frosting as much as the next guy but these were too sweet with it. You can eat them plain, use a basic powdered sugar glaze, or a nice dollop of fresh whipped cream. Or if you want something super sweet you can use the cream cheese frosting.

Enjoy!


Banana Chocolate Chip Cinnamon Rolls
Recipe from What's Cookin, Chicago?

Dough:

1 T active dry yeast
1/2 C warm water (105 deg F)
4 1/2 C all-purpose flour (22 1/2 oz)
1 teaspoon kosher salt
4 large eggs
1/4 C sugar
1/2 C (1 stick) real butter at room temp

Filling:


2 ripe bananas mashed (fresh or frozen)
4 Tablespoons softened butter
1/2 Cup brown sugar
1 1/2 Tablespoons ground cinnamon
1/4 cup bittersweet chocolate chips

Frosting:
5 ounces cream cheese
3 cups powdered sugar
6 tablespoons heavy cream


For the dough: In the bowl of a stand mixer, sprinkle the yeast over the water, allow to bloom for a few minutes, then whisk until smooth. Whisk in 1/2 C of the flour. Cover with plastic wrap and let stand in a warm spot for about 30 minutes.

Add the eggs, sugar, butter, salt, and remaining 4 cups flour to the yeast mixture. Fit the mixer with the dough hook and knead on medium speed until smooth 10-12 minutes. Add a bit more flour to reduce stickiness if needed. Cover with plastic wrap, set in a warm spot and let rise until doubled, about 2 hours.

For the filling: Butter a 9×13 baking dish. Transfer the dough to a floured work surface. Roll out into a rectangle about 15×10 in. Spread with softened butter and sprinkle with brown sugar and cinnamon. Place dollops of mashed banana mixture evenly over top and sprinkle with chocolate chips. Starting from long end, roll up into log shape. Using a sharp knife, cut 1 inch slices and place cut side up in baking dish. Cover tightly with plastic wrap and place in the fridge overnight.
The next morning, remove from refrigerator and let rise until half again as high, about 1 hour. Preheat the oven to 350. Bake until golden brown, about 30 minutes. Let cool in the pan for 15 minutes. Meanwhile, prepare the frosting.

For the frosting: In the bowl of a stand mixer, cream the cream cheese and powdered sugar together. Slowly add the heavy cream 1 tablespoon at a time until desired consistency. Frost the warm cinnamon rolls with half the frosting and wait 10 minutes before topping with the remaining half of frosting. This ensures all the frosting doesn't completely melt away once it's applied. The result should be a nice semi melted layer of frosting on top with a creamy top layer of frosting.

Friday, May 6, 2011

Beignets with Chocolate Sauce

Today my baby girl turns 6!!! I can't believe how fast she is growing up! Her birthday breakfast of choice was beignets, and if you know Anya this doesn't come as a surprise. Beignets are her all time favorite special treat!

I loved this recipe and it will become my go-to beignet recipe. The yeast dough came together quickly (I assembled it last night) and they fried up in about 2 minutes this morning. This made a fancy breakfast on a school morning very easy!

We loved them, the birthday girl loved them, and it was a great start to a great day!


Beignets with Chocolate Sauce

•1 envelope (2 1/4 tsp.) active dry yeast
•1/2 cup sugar
•1 1/2 cups lukewarm water
•2 eggs, slightly beaten
•1 1/4 tsp. salt
•1 cup evaporated milk
•7 cups bread flour
•1/4 cup shortening or butter
•Oil, for deep-frying (I like peanut or canola)
•3 cups powdered sugar

Chocolate Sauce:
•6 tbsp. butter, cut into small pieces
•12 oz. good-quality bittersweet chocolate, chopped
•1 1/2 cups half and half

1.Mix the yeast, sugar and water in a large mixer bowl. Let sit for 10 minutes.

2.In another bowl, beat together eggs, salt and evaporated milk.

3.Pour egg mixture into the yeast mixture and stir well.

4.Add 3 cups of flour and mix on low or stir until combined.

5.Add shortening or butter and continue adding the remaining 4 cups of flour slowly until it’s all incorporated. Dough will be sticky.

6.At this point you can switch your mixer to the dough hook and beat on medium, adding more flour about a tablespoon at a time until the dough pulls away from the sides and forms a smooth ball (about 4-6 minutes). If you don’t have a mixer or would rather knead, place the dough on a floured surface and knead until smooth, adding a little more flour as needed (about 8-10 minutes). The dough may still be a bit sticky, but shouldn’t be overly so.

7.Spray a bowl with cooking spray and place the dough inside. If the bowl doesn’t have a cover, lightly place some plastic wrap on top. Let rise for 2 hours in a warm spot. I like to turn my oven on to the lowest temperature for about a minute and then immediately turn it off again. Then I place the bowl in the warm oven.

8.Filling/Dipping Sauce: In a sauce pan over low heat, mix together butter, chocolate, and half and half. Stir frequently until all the chocolate and butter is melted and the mixture is smooth. Remove from heat.

9.Pour into a bowl and cover.

10.When the dough is ready, place a deep pot like a dutch oven on the stove and add enough oil to fill the pot about 1 to 1 1/2 inches deep.

11.Turn the burner to medium and preheat to 350 degrees.

12.While the oil is heating up, place the dough on a lightly floured surface and roll out into a square or rectangle 1/4 inch thick. Use a knife or pastry cutter to cut into 2×2 inch squares.

14.Set several layers of paper towels near your pot. Fill a paper or plastic bag with powdered sugar and place that near the paper towels.

15.When the dough is cut and the oil is at the correct temperature, add a dough square, one a time, to the pot with a slotted spoon. Fry 4-6 at time depending on the size of your pot. Be careful: if you add too many at once or you may wind up burning them. Use the slotted spoon to flip them over every 30 seconds. Fry for 2-3 minutes or until golden brown on both sides. If they are taking longer than 3 minutes to brown you need to turn your burner up and make sure your oil is at the correct temperature. Remove with slotted spoon and place on paper towels to drain. Let cool for a minute and then transfer to the bag of sugar. Hold the bag closed and toss to coat. Repeat with remaining squares.

Monday, March 21, 2011

Cuban Bread

Occasionally Nathan will come home from work with a food request from one of his guys. I am always happy to bake for them because it gives me another opportunity to get in the kitchen! :)

Last week Nathan was asked if I could make Cuban Bread. I have never had Cuban bread but with a quick internet search I was able to find a recipe and I started it that afternoon.

The bread smelled amazing as it was rising and even better as it was baking! I wish I could tell you how it tasted, but I delivered both loaves straight to Nathan's work. I was told that the guy who they were for said, "Every time I take a bite of the bread I say, Thank you Mrs. Holtgrewe!"

If that isn't a good endorsement for the bread, I don't know what is! Now I want to make it again for myself! :)


Cuban Bread
Recipe from Taste of Cuba


STARTER


3/4 tsp active dry yeast(1/3 envelope)
1/3 cup warm water
1/3 cup bread or all-purpose flour

The day before baking; mix the starter ingredients, dissolving the yeast in the water first. You want a thick paste when you add the flour. Cover bowl with plastic wrap and let "ripen" in refrigerator for 24 hours. Leftover starter will keep for several days in the refrigerator and can be frozen.

DOUGH


4-1/2 tsp active dry yeast - (2 envelopes or 2 cakes of compressed yeast)
1 Tbsp sugar
1-1/2 cups warm water
3 to 4 Tbsp lard or solid vegetable shortening, at room temperature
1/2 batch starter (see above recipe)
1 Tbsp salt
4 to 5 cups bread or all-purpose flour

Dissolve yeast and sugar in 3 tablespoons of water in a large mixing bowl. When the mixture is foamy (5 to 10 minutes), stir in the lard, the remaining water, and the 1/2 batch of starter.

Mix well with your fingers or a wooden spoon. Stir in salt and flour, 1 cup at a time. You want to get a dough that is stiff enough to knead. You can also mix and knead in a mixer fitted with the dough hook or in a food processor fitted with the double blade, as the processor dough hook will not handle this job easily.

Turn dough onto a lightly floured work surface and knead until smooth and elastic, about 6 to 8 minutes, adding flour as necessary. The dough should be pliable and not sticky.

Transfer to a lightly oiled bowl, cover and let rise in a warm, draft-free spot until it doubles its' bulk, about 45 minutes. Punch down.

To form the loaves, divide the dough in 4 pieces. Roll out each to form a 14-inch long tube, with rounded ends (sort of like a long meat loaf) Put 2 of the loaves on a baking sheet, about 6 inches apart. Cover with dampened cotton dish towels and let rise in warm, draft-free spot until double their bulk, about 1 hour. If you want to let it rise at a slower pace, you can do it in a cooler spot and even in the refrigerator, but give it 3 to 4 hours instead.

Preheat oven to 350 F

Lay a dampened piece of thick kitchen string or twine (about 1/8 " thick) all along the top length of the loaf. Bake until the breads are lightly browned on top and sound hollow when lightly tapped, about 30 minutes.

Let them cool slightly and remove the strings. They will leave a distinct little ridge on top. Transfer loaves onto a wire rack for cooling.

Wednesday, January 26, 2011

Cherry Breakfast Cake


How good does that look? I made this a few weekends ago and it was a delicious weekend treat!

I made the dough the night before, let it rise, and assembled the cake. After the second rise, I covered it and refrigerated overnight. The next morning I brought the cake to room temperature while the oven preheated and baked it.

Enjoy!

Cherry Delight Breakfast Cake
Recipe from Tami's Kitchen Table Talk

Ingredients for Cake:

3 C. flour
1/4 C Sugar
1 tsp salt
2 1/2 tsp active dry yeast
1/2 C. milk
1/2 C water
1/2 C butter
2 eggs
1- 21 oz can Cherry Pie Filling

Ingredients for Cake Glaze:

1/2 C confectioner's sugar
2-4 tsp milk


To Make Cake:

Combine 1 1/2 cups flour, salt, sugar & yeast and mix well. Heat 1/2 cup milk, water and butter until very warm and then add to flour mixture, along with eggs. Beat at low speed with hand mixer until all ingredients are wet; beat 3 minutes at medium speed. Stir in an additional 1 to 1 1/2 cup flour until a stiff batter forms. Cover loosely with plastic wrap and a towel. Let rise about 45 to 60 minutes or until doubled in size.

Grease a 13 x 9 pan. Stir batter; Pour 3/4 batter into pan and top with cherry filling. Spoon remaining batter by tablespoons over batter. Cover again and let rise until light, approximately 20 - 30 minutes.

Heat oven to 350 degrees F. Uncover dough mixture. Bake 30-35 minutes or until golden brown.

Meanwhile make glaze:

Mix sugar and 2 tsp milk. Continue adding a little milk until a thick glaze consistency is created.

Drizzle over cake while it's still warm.

For different variations of this cake: try blueberry, apple or mixed berry pie filling in place of the cherry pie filling in this recipe.

Friday, December 31, 2010

Best of 2010 - Happy New Year!!!

Wow! It is the last day of the year! It sure flew by! This is my 250th post for the year!!! Can you believe it? With 250 posts, I thought I should do a round-up of some of my favorite recipes from 2010. Happy New Year! May 2011 be your best year yet!


*~*~*~*~*~*~*~DESSERTS*~*~*~*~*~*~* Pineapple Zucchini Cake


*~*~*~*~*~*~*BREAKFAST*~*~*~*~*~*~*


*~*~*~*~*~*~*DINNER*~*~*~*~*~*~*

Buttermilk Biscuits

Monday, December 27, 2010

Daring Bakers: Stollen


The challenge for Daring Bakers this month was Stollen. Stollen is a traditional German cake/bread, almost like a fruit cake. It has candied fruit peel and dried fruit (I used raisins and craisins) and is so delicious. I lived in Germany for 7 years and loved going to the Christmas markets (that is where the cups you see in the picture came from). There was always Stollen for sale and the beautiful loaf covered in powdered sugar called my name more than once!

I was excited to be able to make Stollen this year. It brought me back to Germany and the fact that it was delicious was an added bonus!

One funny tidbit... My Stollen was almost stolen! :) After shaping the Stollen, I had scraps on the counter. I left the kitchen and then heard the paws of my Rhodesian Ridgeback hit the counter.... She was eating the dough scraps!!!! Luckily I had moved the dough that was to be baked further back so she didn't get it all!

The 2010 December Daring Bakers’ challenge was hosted by Penny of Sweet Sadie’s Baking. She chose to challenge Daring Bakers’ to make Stollen. She adapted a friend’s family recipe and combined it with information from friends, techniques from Peter Reinhart’s book.........and Martha Stewart’s demonstration.

Tuesday, October 12, 2010

Garlic Knots

I love homemade bread. From the mixing to the kneading to the smell of it in the oven. And warm bread or rolls straight from the oven??? You just can't beat that!

I must admit that I have never had garlic knots before, but I have heard wonderful things about them. I decided to give them a go and man were they delicious! My only complaint is that while they were cooked, I didn't let them brown enough so they are a little pale. Oh well... there is always next time!

Enjoy!

Garlic Knot Recipe
Recipe from White on Rice Couple
Makes about 40 knots

Dough
1 3/4 c (415ml) Warm Water (@115°F)
1/4 c (55g) Olive Oil
1 t (5g) Sea Salt
1 T (15g) Sugar
1 1/2 T (20g) Active Dry Yeast
approx. 5 1/2 c (750 g) all-pupose, unbleached Flour

Garlic Coating
1/8 c (30ml) Olive Oil
2 T (30g) unsalted Butter
4 cloves Garlic, finely crushed
1/4 c (60ml) finely chopped fresh Italian Parsley

Sea Salt to taste

plus extra Olive Oil and Flour for making the knots

1. Combine water, 1/4c (55g) olive oil, sea salt, sugar, and active dry yeast in a large resealable container or bowl. Mix to dissolve yeast.

2. Add flour. Mix to incorporate flour, cover, and set in a warm spot to proof until doubled in volume (usually 1-3 hrs depending on initial water temp and warmth of proofing area). (A sunny table outside on a warm summer day is perfect for proofing!)

3. Chill the dough for a bit (will keep fine in fridge for several days if you want to make the dough ahead of time) to make it easier to handle (this can be skipped if you don’t have the time) then set up your knotting station. Put out a large wooden cutting board and oil liberally. Grab a rolling dowel or pin and oil. Grab a pizza cutter or something similar to slice dough in strips. Put container of flour within easy reach. Line several sheet pans with parchment paper or silpats and place within easy reach.

4. Oil your hands to help keep dough from sticking to them. Divide the dough in two parts to make it easier to handle. Take the first half, slap it onto the oiled board several times to flatten. Using the dowel, spread into an even rectangle approx. 5″x16″ and 1/2″ thick. Slice the rectangle into 1/2″x5″ strips.

5. Rotate the board 90° and sprinkle dough strips and board with flour. Taking the strip nearest to you, roll it back and forth to create an even rope. Tie into a knot (over, under, and through) and place on lined sheet pan. Place knots about an 1 1/2″ apart. At first it may seem awkward making the knots but with a little practice it will become easy. Flour is your friend to help keep the dough from sticking to itself while forming the knots.

6. Continue making the rest of the knots with the second half of the dough. After each sheet pan fills up, cover with a dry sack towel, and place in a warm, draft-free spot to rise.

Preheat oven to 400° F

7. After knots have doubled in size, take off dry sack towel and place sheet pans in the oven. Bake for approx. 12-15 min. or until golden.

8. While knots are baking, make garlic coating. Gently warm olive oil, butter, and garlic in a small saucepan (if you like your garlic with less of a bite, cook it for a few minutes in oil/butter mix until soft & slightly golden). Add chopped parsley and set aside.

9. After removing knots from oven, while still warm, either brush with garlic coating, or place knots in a large bowl and toss with garlic coating. Season with sea salt to taste.

Best served warm, but still good when at room temp.

Thursday, October 7, 2010

Pumpkin Cinnamon Rolls with Caramel Frosting

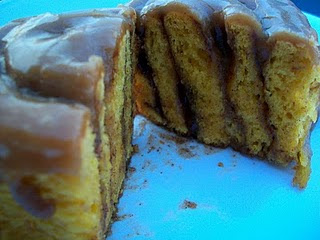
I love cinnamon rolls and I love pumpkin. Put the two together and I am literally in breakfast treat heaven! I took what I liked from 2 recipes, added in my own twist on the filling, and ended up with what Nathan and I consider one of the best cinnamon rolls we have EVER tasted!

The pumpkin is noticible but not overwhelming. The filling is classic cinnamon with the addition of some pumpkin pie spice and a dash of cloves. And then there is the frosting. Oh my... the frosting! I considered going with a traditional cream cheese frosting (which you totally could do) but got the caramel idea in my head and couldn't get it out! The frosting is simple to make and pours right over the hot rolls (no spreading required!). After a few minutes, it firms up like a glaze. Oh so good!!!I made this recipe for 6 rolls since I have a family of four but could easily be doubled for a larger group. And you might just want to double it and share. People will seriously love you!

Enjoy!


Pumpkin Cinnamon Rolls with Caramel Frosting
Makes 6 LARGE rolls

Rolls:
1 1/8 tsp or 1/2 envelope active dry yeast
1/8 cup warm water
1/2 tsp PLUS 2 TBSP granulated sugar (divided)
1 egg
2 TBSP unsalted butter, melted
7.5 oz canned pumpkin
2 3/4 cups all purpose flour
1/4 + 1/8 tsp salt

Filling:
4 TBSP unsalted butter, softened
2 TBSP granulated sugar
1/2 cup packed brown sugar
1 1/2 teaspoons cinnamon
1/2 teaspoon pumpkin pie spice
Dash cloves

Frosting:
1/4 cup unsalted butter
1/2 cup packed brown sugar
1/8 teaspoon salt
2 TBSP milk or cream
1/2 teaspoon vanilla
1 1/4 cups powdered sugar

Sprinkle yeast over warm water in large bowl. Add 1/2 tsp of the granulated sugar; let stand until foamy, about 5 minutes.

Mix in remaining 2 TBSP sugar, egg, butter and pumpkin. Gradually add 2 1/2 cups of the flour and the salt until soft dough forms. Continue to knead for 10 minutes, adding remaining flour as needed, until dough is smooth.

Place dough in large greased bowl and allow to rise until doubled.

Once doubled, roll dough out into a rectangle. Combine all filling ingredients and spread evenly over rectangle. Roll up dough and cut into 6 rolls.

Place rolls in greased 8" pan and allow to rise until doubled.

(At this point, you can either bake or refrigerate the rolls overnight and bake in the morning. If you are refrigerating the rolls, allow them to come to room temperature before baking.)

Bake the rolls at 350 for 25-30 minutes or until golden and bubbly. Remove from oven and make frosting.

To make frosting, melt butter in saucepan. Add brown sugar and stir until smooth. Add milk and vanilla and stir to combine. Add powdered sugar all at once and whisk until clumps disappear. Pour warm frosting over cinnamon rolls. Let set for 5 minutes and serve.

Recipe adapted from Examiner and Tasty Kitchen.

Monday, September 20, 2010

CIA Homeschool: Batard (Whole Wheat Lean Dough)


Go ahead.... I'll give you a minute to pick your jaw up off the ground. You probably thought that I had given up on my CIA project since it has been about 3 months since I have posted something. I really haven't forgotten, but out of all the things I do for this blog, CIA Homeschool kinda gets pushed to the back burner since there are no posting dates/rules/minimum posting requirements. I am slowly hacking away at the list and hope to not have 3 more months pass before I post again!

This bread is a great one to come back with. This is one of the best homemade wheat breads I have ever had. It was so soft and so delicious. The loaf was gone pretty quickly (not sure it even lasted 2 hours!) and I will definately be making it again!


List of Recipes to be made from CIA book


Yeast Raised Breads and Rolls

Boule (White Wheat Lean Dough)
Split Loaf (Lean Dough with Pate Fermente)
Batard (Whole Wheat Lean Dough)
Baguette (Lean Dough with Poolish)
Grissini
Bagels
Ciabatta
Stollen
Pannetone
Soft Roll Dough (Knot Rolls & Parker House Rolls)
Brioche a Tete
Craquelin
Challah (6 Braid)
Coffee Cake (Twisted)
Pita Bread
Apple Fritters
Berliners (Jelly Doughnuts)
Yeast Raised Doughnuts

Yeast Doughs (Not listed above)

Prosciutto and Provolone Dough
Tomato Dough
Roasted Potato Dough
Apple and Walnut Sourdough

Quick Breads and Cakes

Ginger Cake
Buttermilk Biscuits
Bran Muffins
Lemon Buttermilk Cake
Polenta Cake
Devil’s Food Cake
Chocolate XS
Carrot Cake
Roulade
Chocolate Souffle Cake
Patterned Jaconde Sponge
Walnut Cheesecake

Cookies

Mudslide Cookies
Sand Cookies
Orange Coconut Macaroons
Fudge Brownies
Pecan Diamonds (Short Dough)
Mirror Cookies (1-2-3 Cookie Dough)
Citrus Crisps
Zedern Brot
Vanilla Kipferl
Checkerboard Cookies
Madeleines
Springerle
Vanilla Pretzels
Ladyfingers
Langues-de-Chat Sandwiches
Frangipane Cake (Made into Petit Fours)

Custards, Creams, Mousses, and Souffles

Crème Brulee
Pots de Crème
Vanilla Pudding
Lemon Curd
Chocolate Mousse
Bavarian Cream
Raspberry Souffle

Frozen Desserts

Chocolate Swirl Ice Cream
Lemon Frozen Yogurt
Orange Sorbet
Vanilla Bean Sherbet
Fresh Ginger Granita
Praline Parfait
Frozen Lemon Savarin

Pies, Tarts, and Fruit Desserts

Blueberry Pie
Warm Apple Charlottes
Lemon Fantasy Tart
Zesty Lime Tart
Cheese Tart
Clafoutis
Cranberry Pecan Tart
Apple Strudel

Filled and Assembled Cakes and Tortes

Bavarian Cream Torte
Charlotte Russe
Black Forest Cake
Opera Torte
Orange Mousseline Torte

Individual Pastries

Lemon Curd Tartlets
Pecan Cranberry Tartlets
Strip Tartlets
Pecan Passions
Classic Napoleons
Chocolate Peanut Butter Bombes
White and Dark Chocolate Mousse in Glasses
Trifles
Chocolate Eclairs
Bear Claws

Plated Desserts

Blueberry and Cream Cheese Crepes
Brown Sugar Roasted Pear
Funnel Cake with Maple Syrup and Summer Fruit Sauces

Chocolates and Confections

Milk Chocolate Truffles
Fujiyamas
Rochers
Candied Orange Peel
Soft Caramels
Hard Candies
Fudge
Nuss Bonbon
Marshmallows

FINAL PROJECT

TBD (Trying to pick a cake with gumpaste, modeling chocolate, and possibly pulled sugar)

Related Posts with Thumbnails